Icam OScam Server Installation Script

Icam OScam Server Installation Script 2024.

Follow this guide to set up your automatic Icam installation script on any receiver.

We’ve crafted an auto installation script tailored for Icam compatibility across all receiver models.

This script seamlessly installs OScam Icam and handles bouquet uploads and other essentials.

For optimal performance, we suggest using Open ATV 7.3 on an ARM 4k box. However, you can also implement an OScam/iCam installation with alternative images or HD receivers (refer to V2).

Set receiver settings

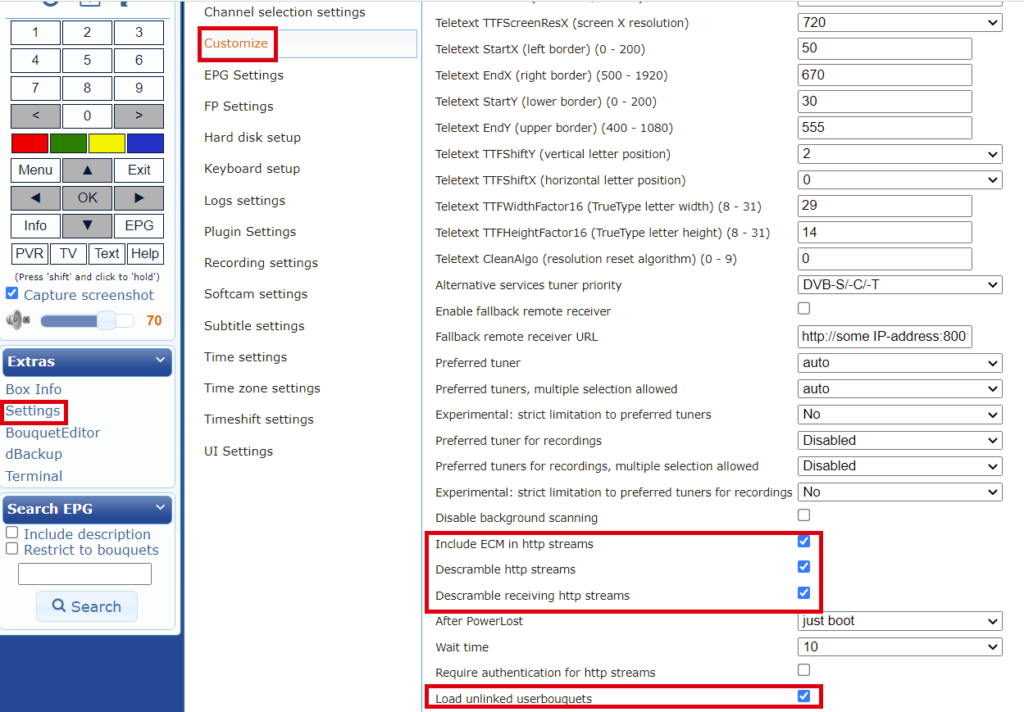
Set the following settings for OpenATV images:

  1. Menu button > Settings > Operation + interface > Extras / adjust system settings
  2. Integrate ECM into HTTP streams – NO
  3. Decrypt HTTP streams – YES
  4. Decrypt received HTTP streams – NO
  5. Load unincorporated bouquets – YES
  6. Save with the green button
  7. Restart box
screenshot 2023 09 21 103021

Icam auto installation script (V1)

The following steps are only possible with a working internet connection:

  1. Open the receiver’s web interface. (Enter the receiver’s IP into the browser)
  2. Bottom left on Terminal
  3. Enter login and password (root / root) or use your own password.
  4. Change password under Menu button > Settings > System > Network > Password
  5. Insert the following command: wget -qO- cccamteam.com/icam-installation | bash
  6. ​Confirm with
  7. Softcam menu is created. Possibly restart.
  8. Blue button > Softcam > Download Softcams and select the desired cam
  9. The softcam is activated automatically. installed (wait until the installation process is finished)
screenshot 2023 09 06 193524
screenshot 2023 09 06 194455

Icam auto installation script (V2)

The following steps are only possible with a working internet connection:

  1. Open the receiver’s web interface. (Enter the receiver’s IP into the browser)
  2. Bottom left on Terminal
  3. Enter login and password (root / root) or use your own password.
  4. Change password under Menu button > Settings > System > Network > Password
  5. Insert the following command wget -qO- cccamteam.com/icam-installation-v2 | bash
  6. ​Confirm with
  7. An installation screen appears
  8. Select point 1 (Install Icam Oscam stable). 
  9. Then choose your image, e.g. OpenATV
  10. The softcam is installed, then end the process with 0-Back/Exit.
  11. The receiver will automatically restarted

Known problems

Here are some problems that can arise and suitable solutions:

  1. Enter the box’s IP in the browser and select OScam interface to check whether the OScam is running at all.
  2. OScam does not start > Solution: OScam path in etc/tuxbox/config not created correctly or incorrect.
  3. Can’t get a WiFi connection > Solution: Special characters in the WiFi password or incorrect WPA/WPA2
  4. FTP reports “wrong password” > Solution: Create a new password
  5. Freezer with two activated tuners (Twin Tuner Receiver) > Solution: Activate only one tuner
  6. Installation stops > Solution: Uninstall OScam beforehand (see instructions at the very beginning)
  7. OScam installed but no channel is bright > Solution: Search for channels 


Softcam/Plugins

  1. Premium CCcam Server (You can buy here)
  2. OScamicam_11751-emu-r800 ARM all
  3. Oscamicam-py3.10_11757-emu-r801_all
  4. Oscamicamnew_11777-ICAMEMU-Kitte888-V3Rev_all
  5. Ncam_V14.9-r0_complete (OScam alternative)
  6. Plugin-extensions-oscam/ncam Status_6.3_all

Receiver recommendations

The following devices are supported by Open ATV or PLI

  1. AB Pulse 4k mini  ( test )
  2. Gigablue UE 4k
  3. VU+ Duo 4k SE BT Edition

Disclaimer

Despite careful content control, we assume no liability for the content (Icam OScam Server Installation Script) of external links. The operators are solely responsible for the content of the linked pages.

Translate »